Installation and details
How a roof valley drains the junction between two slopes
A roof valley needs stable support, a continuous underlay and a sufficiently wide drainage path so that water from both slopes can flow freely to the eaves. The most common problems arise from screws placed in the water course, cut pieces that are too narrow, and leaves blocking the valley. Before covering, it is worth checking the geometry where the slopes meet, the evenness of the cut line and the placement of fixings outside the main flow. Also make sure the lower end of the valley discharges water correctly into the gutter and that the membrane beneath the covering has no gaps.
Where does a roof valley form and why is it important?
A roof valley is the concave intersection line of two roof slopes. It occurs with a complex building form, with certain dormers and at the junction of added building sections. Water flows into it from both sides. The larger the slopes it serves, the more its width and flow capacity matter. Snow can lie in it longer than on an open section of roof.
A roof valley must not be confused with a convex corner covered by a hip ridge. Both places require cutting the sheet metal, but they behave differently. At the corner, water spreads to the sides, whereas in the valley it is concentrated. Therefore, a solution that works at the ridge or corner must not be transferred to the valley merely because the flashing has a similar colour.
How do you prepare the support and the layer beneath the covering?
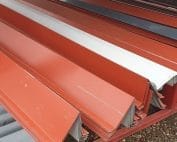
Valley flashing requires an even, stable substrate made according to the detail for the given system. Additional support is often used along the valley. Its arrangement must not create depressions in which water will collect. The geometry of the slope junction is also checked before covering. Later straightening of undulating flashing is difficult.
The underlay must remain continuous beneath the valley. The type of overlaps and any additional strip depend on the membrane and covering instructions. Water that gets under the sheet metal must drain to the outside. It must not end its path on cut film or in the insulation. Sealing the visible flashing does not replace this second level of protection.
How do you fix the valley flashing?
Fixing is carried out outside the main drainage path and in accordance with the intended detail. Piercing the valley base with screws increases the risk of leakage. The flashing must also be able to move under the influence of temperature. A long section must not be rigidly fixed with randomly placed fasteners. The details depend on the material and the length of the elements.
Successive sections are laid so that water passes from the upper element to the lower one. The size of the overlap and the required sealing depend on the pitch and the instructions. There is no single overlap length suitable for every valley. The joint must remain tight even during heavy rain and when drainage is temporarily slowed by wet snow.

How much space should be left between the edges of the covering?
Tile-effect metal roofing is cut on both sides of the valley, leaving an open drainage strip. Its width is selected according to the geometry and conditions of the roof. A gap that is too narrow easily collects leaves, and water can be pressed under the cut edges. Conversely, randomly moving the covering back without sufficiently wide flashing exposes its edges or fixing points.
The cut line should be straight. The tool must be suitable for coated steel sheet and must not overheat the edges. Swarf should be removed immediately. If profiled or wedge-shaped seals are specified, they must be matched to the roofing system. Their purpose is not to create a dam. Material laid too close to the centre of the roof valley may restrict flow instead of improving the seal.
How do you connect a roof valley to the eaves and gutter?
The lower end of the roof valley must safely discharge water into the gutter or another designed receiver. The flow is concentrated here and may overshoot a gutter that is set too low or poorly positioned. The relationship of the flashing to the gutter apron and the edge of the covering must be checked. Ending the roof valley flush with the fascia board alone does not guarantee proper drainage.
On a multi-pitch roof, several roof valleys may feed one short section of gutter. In that case, the position of the downpipe and its diameter also matter. The solution should be based on a calculation of the entire drainage system. In the event of overflow, water must have a safe emergency path instead of backing up under the covering or behind the façade.
What should be checked at handover and after the season?
Before acceptance, it is worth inspecting the roof valley from a safe position. The line of the cuts, the position of the fixings, the laps and the termination at the eaves are checked. There should be no sheet offcuts, film remnants or swarf in it. Photographs taken before the detail is covered help confirm the continuity of the underlay, which cannot be assessed from the finished covering.
Later, the roof valley requires periodic removal of debris. An inspection is particularly important after leaves have fallen and after a strong gale. If a leak occurs, its path must be determined, not merely covered with another layer of compound. Water may enter higher up, at the joint between sections, and only become visible inside the attic. A narrow roof valley near tall trees is worth checking more often than an exposed roof pitch.
7 branches. Materials closer to your project.